Form Guide Help at Horse Racing Tips
Easy-form is provided to allow you to narrow down your selections in the quickest possible time by using groups of categories to either match or eliminate qualifying selections.
 Table Rating for race
Our market price
estimates are now derived from one of two historical tables named 'A' or
'B". An 'A' or 'B" next to the race class heading indicates which
table was used to determine the market prices. Table A holds specific
information about the track and distance (we no longer check going, area and
day-of-week) and Table B is specific to the distance only. A combination of
Table 'A' and Table 'B' may be used, but only the most common one is indicated.
Table 'A' should be slighter closer aligned to the real market.
The details within the [square brackets] indicate information about the average
form we used to produce our ratings. We provide this information as a possible
filter for you to use, because the less information we have, the less accurate we are. The first number indicates the average form per horse and the second
number indicates the average form per horse at the distance, but only if the
horse has form (ie debut horses are not in the average). This information is
also included in the Quick Print tables. For example, "[9-1]" above means each horse has, on average, 9 starts and each horse, on average, has had 1 run at a similar distance (e.g. 1800m)
Selections and Results Table
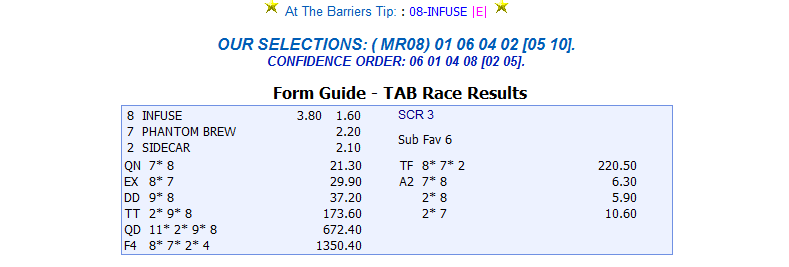
At the Barriers Tip
This
tip is a Level 3 subscription tip. It is provided within the last few minutes
before the official race start time (Usually within 3 minutes to 30 seconds). A
code |A| to |E| is added to the tip to provide a very basic insight into the
quality of the horse. It should be used as a guideline only. "Value"
and "Roughie" tips may also be provided representing good value in the
market. Sometimes a race may be flagged as a "Poor betting Market",
this means that there is little race confidence and the information used with
care. We will indicate if a horse is a first starter. We only provide this
service on races that are covered by both the QTAB and Betfair. If we cover the
race, and there is no selection, we will advise of this.
Our Selections
These
selections are the top 6 HRT ratings (refer below) in order. They are provided
at the time of the initial posting and subject to charge (e.g. due to
scratchings, jockey changes, going changes etc).
Confidence Order
These
selections are the top 6 Confidence Factor ratings (refer below) in order. Level
3 subscribers have access to early morning ratings (about 6:45 am EST). Other
subscribers have access to the final ratings around 8:45am EST and subject to
charge (e.g. due to scratchings, jockey changes, going changes etc).
Form Guide - TAB Race Results
Race
result details as posted on the QTAB website provided for your convenience as
early as possible after the running of the race..
Form Guide - General Information Table
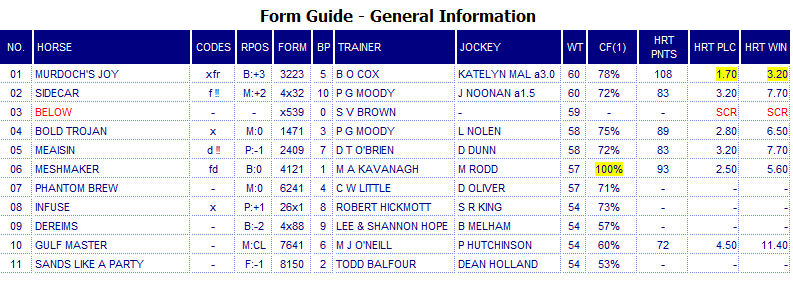
The following symbols
will be displayed next to the appropriate horse's name if there is a tip in the
race. They can also be identified under Data Listing
or Quick Print pages. Overlays are important in most cases :-

|
Premium Tip
symbol. This tip will only
display if you have purchased the Premium Tip
|

|
Super Tip symbol.
This tip will only display if
you have purchased the Super Tip or are a paying subscriber (then it is free).
|

|
Free Tip symbol.
This tip will only display if
you have Pay-Per-View or subscription access (however, it can be viewed under
the free tips listing on the main page).
|

|
Sure Fire Tip symbol.
This tip will only display if
you have Pay-Per-View or subscription access. It is also the most commonly used
tip by subscribers.
|

|
'Best Bets' Tip symbol.
This tip will only display if
you have Pay-Per-View or subscription access. It is also one of our oldest tip being
provided since starting in January 2002.
|

|
Extra Value
Tip symbol.
This tip will only display if
you have Pay-Per-View or subscription access. Older selection method to
find winners and place getters at higher odds.
|
  
|
Ready to Win Tip symbols.
This tip will only
display if you have Pay-Per-View or subscription access. These green dots indicate
that the horse is performing well. If you follow exotics, we
recommend that you include these horses in your combinations.
|
|
* *
*
|
No form
symbols. These
are not tips but rather a rating for no form horses. It uses jockey, barrier,
trainer, barrier trails etc to provide some indication on how the horse may be
considered in the market when the race is near jump time. The symbols range from
having no pink asterisks
to a maximum of three pink asterisks (the latter being for the most desirable no form
horses). Useful for early market betting when the market is not active enough
to gauge no form horses. Should not be used for selecting bets, but maybe an
indicator to eliminate a race if a strong no-form horse is in the race and may
beat your selection.
|
Codes (Flags)
"t" - likes this track,
"T" - loves this track
"l" - Lightly weighted (usually with f or F, therefore light and
fast!)
"f" - fast times,
"F" - super fast times (should also have "d" code for
strong indicator)
"d" - Top 3 distance ratings
"x" - Top 3 strike rate and strike rate over 20%,
"X" - Top 3 strike rate and strike rate over 40%
"r" - low (good) risk value
"s" - good first and last sectional times
"c" - class rating > 10% lead, "C" - class rating >
20% lead
"k" - top 2 class rating > 10% lead, "K" - Top 2 class rating >
20% lead (k or K - always 2 in race).
"!" - Normally a "Heavy Weight Marker/s" - refer below for details
Heavy Weight Marker/s: A "!" normally means the Horse is running with more than 57kg (after deducting the jockey's allowance weight) AND the horse has shown performance issues previously at such weights. It could be a useful indicator if you want to eliminate your BACK selection, however, since class is not being considered, it should not be used as a LAYING strategy. A second "!" means that the horse also runs mid field or worse (in this race) AND is a slow finisher, so the heavy weight may impact it more than normal down the straight (once again, no consideration to class). However, the jockey may ride this horse closer to the front to mitigate this. In general though, a flag code of both indicators (e.g. "!!") should be seriously considered as a disadvantage. Sometimes a "!" means the has performed poorly First Up. This may be confusing to differentiate, but the intention of the Exclamation Mark system is to show Horse's that are generally disadvantaged, not specifically why. If you need to differentiate, the HEAVY disadvantage Field (refer below in EasyForm section) only lists the Heavy Weight Marker/s.
Running Position (Rpos)
This table details the horses
estimated running position of today's race. It takes into consideration barrier
position, its past running positions and its "out-of-the-gate"
speed. The number next to the codes below indicates the " losses to wins" delta in the calculated running position. A horse
that has run well in 6 races in this position and has run poorly in 2 races in
this same
position will have an advantage delta of + 4. A horse with (0) means that it shows
no bias. A horse with "?" means that we are unsure of its
running position and it has not shown past ability. We suggest that you
avoid races where there are many unknowns (or question marks). A leader
with a high positive delta is idea so that the race ends up running as
determined. A horse with "CL" means that the horse has run
poorly in this position in the past but is better off in this race due to a
lower Class race or lower weight - also expect back runners to run closer mid
field.
Positioning codes;
(F:#) - Front Runner
(P:#) - Pace Runner (i.e. 2nd or 3rd)
(M:#) - Mid Field Runner
(B:#) - Back Runner
(X:#) - Large Field Back Runner
There is also a graphical representation - click on RPOS link.
Trainer
This field details the
Trainer that trains the horse. If this field has "UNKNOWN" as
the trainer, this more than likely means that the trainer is not listed in our
top rated trainer database rather than the literal meaning of the word.
Confidence Factor (CFactor)
This field represents our Confidence Factor for each horse's chance of
winning and should be used to determine how much overlay (or underlay) is
required. For example, a horse we rate at $2.00
and has a low confidence factor should demand a large overlay, conversely
a $2.00 rated horse with a high confidence factor should be considered
as a strong chance of winning without regard to overlay. If we rate a horse at say $10 and it has a high confidence
factor, then this horse could represent value if you can get a good
overlay on it. A horse we rate at $10 with a low Confidence Factor could
be a good lay. HRT pricing and Confidence factors are different methods
so you may see anomalies, this is because HRT prices consider the past
7 runs, whereas the Confidence Factor only considers recent runs (usually they
both consider the same runs, but in some cases they may not especially when
horses are not consistent in form). Use the Confidence Factor as a "second opinion" on our
ratings! A suggestion is to consider horses with Confidence
Factors of 80% or
more for the win and include any Confidence Factor rated horse (40% or
above) for your exotic multiples. You may be able to add additional
value by considering the horse's distance ability, our overall
risk factor under Easy Form and other factors like the number of
past runs, first up etc. This field is less accurate for
"Insufficient Form" races. Warning: A rating of
100% does not mean that the horse will definitely win (we wish) but means
a horse has a strong chance of winning. We have found that, although the strike
rates are high, the general public are aware of these horses and therefore are
typically over-bet and eliminate any chance of long term profit - it may be a
strategy to avoid them!
HRT PNTS
This field details our raw
rating used to calculate the HRT price (HRT WIN and HRT PLC - refer below).
The rating is not based on individual levels but on how each horse ranks in each
EasyForm category. For example, a horse rated first in Class/Wgt will get the same points allocated to another horse rated first in Class/Wgt in another race, regardless of their Class/Wgt rating. We would expect that
the superior rated horse would be ranked higher in more categories and get a
better rating overall. The important factor is not so much the rating
itself (although a race with low ratings is a difficult race) but the gap
between them. The larger the gap (ie 10%+) the more certain the selection
is to perform well. For interest sake, the maximum rating to date is 290 held by two
horses. Both won at $1.30 and $1.40.
HRT PLC and WIN
These fields use the "HRT PNTS" as a rating. We then calculate the percentage chance of "HRT PNTS" winning or placing (when taking into consideration all other horses in the same race). For example, if a horse with a certain "HRT PNTS" has a 50% chance of winning, we would rate it $2. Likewise for the place. The "HRT WIN" and "HRT PLC" reflect these dollar values. The yellow background just indicates it is the Top Rater.
Good Debut Horse (GDH)
Good Jockey, barrier and trainer. Usually the market
picks up on this. We recommend that you only use this information to avoid the
race, include in your exotic bets or bet on if it is at great odds (e.g.
>10/1). If there are no SF/F & D runners in Best Speed/Wgt, then it has
a good chance of winning.
Form Guide - Markets Table
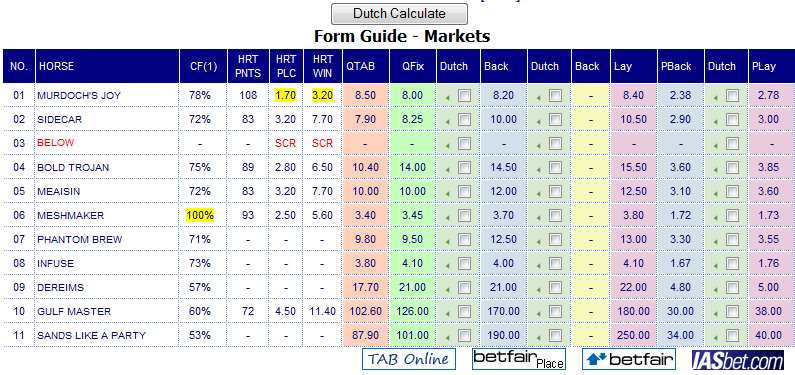
This
table presents the current QTAB Tote and Fixed priced odds at time of display.
It also presents the current Betfair Back and Lay Win and Place odds at time of
display. A Dutch Calculator is also provided for Dutch betting between QTAB's
fixed odds and Betfair Win and Place Back odds (although place Dutch betting is
not normally focused on by most). The
four links at the bottom of the page will direct you to the appropriate
provider's page for the particular race. For example the Isabet.com link will
take you directly to the betting page for this race.
Form Guide - Distance
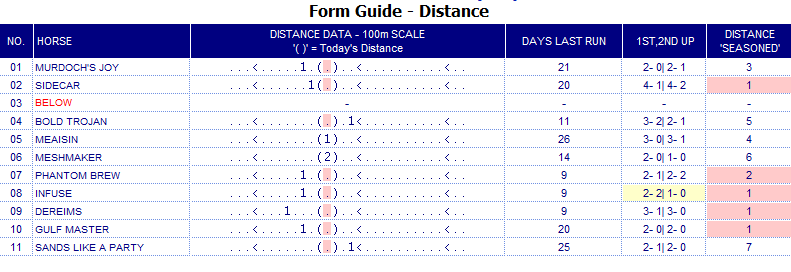
Distance Data
This
data is a little difficult to interpret. Each "." represents a
distance from 800m to 3200m. A "<" symbol shows where the 1000m,
2000m and 3000m points are. The above example is for 1800m (rounded to the
nearest 100m). To assist in identifying where today's race distance is, we put
today's distance data in brackets e.g. "( )". The higher the number,
the better the performance at today's distance. Numbers to the left mean the
horse has performed at shorter distances. Numbers to the right mean the horse
has performed at longer distances. The most important data is within 200m for
short distance races, 400m for medium distance races (like the example) and 600m
for long distance races.
Days Last Run
Days
since the horse's last run.
This information is important for horses coming back from a spell or are backing
up quickly after a recent race.
1st, 2nd Up
Performance
of the horse for first up runs (after a spell) and second up runs (after a
spell). The first number is the number of runs, the second, the number of
wins.
Distance 'Seasoned'
This
data shows how well the horse is 'seasoned' to run at today's distance using
official race data. If the data shows that a horse is 'seasoned' it should be a
reasonable indicator to show that the horse will run out the distance. The rule
is, the longer the distance, the more distance seasoning required. However horse
training is not always official (e.g. at trackwork, barrier trials etc) so a
horse can still be seasoned without any indicator here.
Form Guide - Jockey Trainer

RPOS/BP Bias Range 0 to 100% (100% best)
This
data provides an alternative aspect to the typical barrier tables most punters
check. Many punters may wrongly assume, as an example, that a wide barrier is a poor
barrier, however, if the horse is a strong leading horse, it should quickly run to
the front without much difficulty. A strong backmarker can drop to the back with no effort at all. Therefore the barrier position should be taken in consideration with the running style/strength of each horse. This data attempts to do this and represents it as a percentage. A percentage higher than 50% indicates a positive bias and less than 50% indicates a negative bias. A green background shows a strong positive bias, a red background a poor negative bias. Relying on this information alone many not pick winners, but this information should serve useful for people that need to find reasons to eliminate or consider their own selections.
TR LVL Range 0 to 100% (100% best)
This data uses our trainer rating. It lists all trainers (not just the top 5 as listed in the Easyform table) but as a percentage. It also shows the trainer rating for unraced horses (which is not listed in the Easyform table). To calculate our actual trainer rating, find the 100% rated horse trainer rating in the Easyform, then divide this number by each percentage listed i.e. If the 100% horse has a trainer rating of 26 in the easyform table, the horse rated at 86% would be 26/.86 = 30.
JOCK LVL Range 0 to 100% (100% best)
This data uses our jockey rating. It lists all jockeys (not just the top 5 as listed in the Easyform table) but as a percentage. It also shows the jockey rating for unraced horses (which is not listed in the Easyform table). To calculate our actual jockey rating, find the 100% rated horse jockey rating in the Easyform, then divide this number by each percentage listed i.e. If the 100% horse has a jockey rating of 10 in the easyform table, the horse rated at 75% would be 10/.75 = 13.
JOCK BONUS Range 0 to 100% (100% best)
This
is a jockey, track, distance rating as a percentage. If the Jockey that performs best at a certain
track and distance, will receive 100%. Poor jockeys or jockeys without data will be 0%. A green background shows a strong positive bias, a red background a poor negative bias. This data can be useful for identifying good performing jockeys with local or distance ability (other jockey tables do not take these parameters into consideration).
OVERALL SCORE Range 0 to 100% (100% best)
This
is the total score for Running and Barrier bias, Trainer, Jockey, a jockey bonus, represented as a percentage. Any figure greater that 60% has a green background.
JOCK Rides
This
is the Jockey's performance on the horse. (no. of rides on horse) : (wins on
horse) - (places on horse) S: (samples in database) L3: (Rides in last 3 runs)
(! = poor performance) (# = late jockey allocation or change). Look out for high
strike rate jockeys (e.g. wins and places high for no. of rides) returning to
the horse (e.g. L3: 0). Some
interesting pointers are:- 1. When the jockey as ridden the horse last 3 starts
(E is 3) but no wins or places recorded. 2. When the jockey has not ridden the
horse for the last 3 starts (E is 0) but a lot of wins or places are recorded -
e.g. a jockey is back on that performs well (this could work powerfully with the
Jock Bonus above).
Form Guide - Easy Form (Part A)
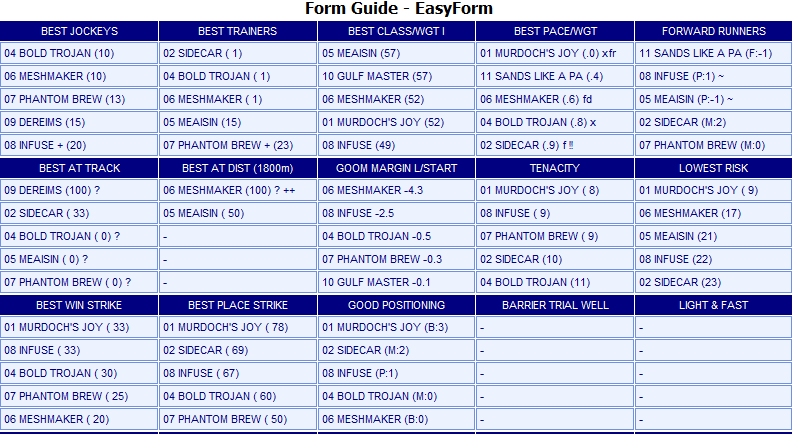
Best Jockeys
Each jockey's rating is calculated on the
number of city and/or country wins, places and the number of runs in the race
state (e.g. NSW, VIC etc) today. Therefore a good jockey from VIC may not be rated as highly if
riding in NSW, mainly because its experience may be less in a different state
(as indicated statistically). Ratings are calculated over 2 years and the
tables are updated about twice a year.
This table may list less than 5 jockeys or no jockeys at all. We have a cut off
point on quality. This ensures we don't list mediocre jockeys that are the
"best of a bad bunch". You can find all the jockey ratings under
table B.
Sometimes you may find a horse rated in the "Best Jockeys" category without
a jockey declared for the day. The reason why this occurs, is that we
make an assumption that the same quality jockey will ride this horse as
previously. This usually ends up being the case (and our market estimates are
calculated on what should eventuate). However, you should make sure
that a good jockey does end up riding the horse. We will endeavour to update
our tables with the known jockey (and correct rating) when the information comes to hand.
The number next to the horse name is our jockey positioning by state. A
"(1)" indicates that the jockey riding the horse is, in our opinion,
is the best jockey in the state.
The
"+" next to the jockey name means that the jockey is having their ONLY
ride today - a great indicator to check (especially if the Trainer is also a top 5
trainer). This is a late calculation.
Best Trainers
Same
principle as jockey ratings.
Best Class/Wgt I
This section is a variation of the
"Winning More" class system created by the late and legendary DON
SCOTT. This is a complex system in itself and many people just follow this type
of information. The DON SCOTT class rating* is provided in brackets ie
(65) meaning a class rating of 65. Look for 5-10kg gaps between runners
indicating a truly classy horse when compared to the rest of the
field. This category provides an in depth analysis of class and the affects of
class and
weight changes on a horse. We recommend that you review
DON SCOTT's book to understand his principles. "Winning More" is published by
Horwitz Grahame Pty Ltd ISBN 0 7255 2115 5 and is a
brilliant class determination method. It does not consider other variations such
as race times and running pattern, which we include in our other categories
to provide a complete service.
This class system
(Version I) relies on certain "Form Patterns" to determine a horse's
"baserun". We do not always use the horse's last race, as the "baserun" used
depends on the form pattern of its past recent races. Because horses can
have reasons for poor runs, we can check as far back as 7 runs.
* We exclude jockey ratings in this category because we use
the Best Jockey category
instead.
Best Pace/Wgt
This section works on the horse's overall race times
at similar distances and average weights. We analyse its current preparation and
a similar period last preparation. The data is then
compared to today's weight. Additional codes include; fast-codes (sf=super
fast, f=fast)
which indicates faster than average runners, and a distance-code (d) which
indicates if a horse has run at this distance. If there are a lot of debut
horses in the race and there are no horses in this section that has a fast-code,
it is best to avoid the race as a debut horse has a better chance of winning
over average speed horses. A "sf"
fast-code at the "d" distance code, indicates a powerful combination.
However "sf" without "d" indicates a risky position - it may
over-race and/or not run the distance. We also include a "^" code indicating when a horse has
not been "seasoned" for the distance in the current preparation. This
does not mean the horse is not a winning chance, just some additional risk so
you may wish to avoid the race.
The value in
brackets for each horse indicates the delta in times compared to the top
rater. Of course the top rater will always be (.0). More credit should
be given to horses that have the "d" flag as this indicates a more
accurate time.
Look for the "light and fast" section to see how
the horse fairs there
also.
Speed is a difficult rating to use. It's rating can be
very impressive or misleading. For example, horses that win by large margins
more than likely canter over the line to preserve fitness. Others sometimes are not pace
setters or leaders and so their times are set by others that lead in their
races.
Forward Runners
In a race with a lot of form, this category typically
indicates the top leaders of the race to set the pace. The probability we post
for the horse's chance of winning a race usually relies on these horses actually
running these positions. So during the race, check the front markers and if we
have these close to actuals, then the odds should fall true. A race may not run to our
predictions because of varying racing conditions, a jockey's change of plan or
even a horse fitness to name a few. In this case, luck will play its part.
The '~' code
indicates horses with fast first sectional times. You can use this information
to determine whether a horse will get across from a wide barrier or checking any
leader conflict early in the race. For example, a front runner (f) on the outer
barrier of a fast pace runner (p~) may both race too hard early. It is preferred
that the front runner have the fast sectionals (f~) or at least a closer barrier
to the rail over the p~ horse. If confused, skip the race.
This category is also useful for race-days when leaders
win most races, for whatever reason they do, it is useful to know the next
leaders of the next race!
To determine which tracks and distances suit and disadvantage front runners
click on front runner stats.
Best At Track
A category on the track
strike rate. A '+' indicates that the horse performs better at this track
than any other track. The indicator is not dependent on the track strike
rate, so a horse can have the '+' symbol without being a top track rater.
Ideally a horse should have the best track strike rate and a '+' indicator.
We provide a second '+' indicator for horses that are truly biased to the
track - Watch for these.
The "?" indicator means that the runs on
the track are 2 runs or less, so the sample may be a little low to make any
judgement. The
(###) value provides a 'point system' strike rate with one point for 1st and
fractions for 2nd and 3rd. Since decimals are rounded, points may be slightly
exaggerated for small samples. A ( 100) means 100% strike rate and can
only be achieved if they were all wins.
There is a special value of (0) which indicates the horses with some (2 races) track
experience, but with no points.
Best At Distance
A basic category on distance success. A
range of 0-3 pluses ('+') are used to indicate how good the top distance
raters are. We also include a "^" code indicating when a horse has
not been "seasoned" for the distance in the current preparation. This
does not mean the horse is not a winning chance, just some additional risk so
you may wish to avoid the race.
The "?" indicator means that the runs at
the distance are 2 runs or less, so the sample may be a little low to make any
judgement. The
(###) value provides a 'point system' strike rate with one point for 1st and
fractions for 2nd and 3rd. Since decimals are rounded, points may be
slightly exaggerated for small samples. A ( 100) means 100% strike rate and can
only be achieved if they were all wins.
Good Margin Last Start
This section details the horses that won a race last
start irrespective of the class or time of the race. Therefore this field should
be analysed with the class and time categories provided, but in some cases,
horses may be moving up in grade or cantering to the line, so class & speed
are not always conclusive.
Tenacity
The horse's tenacity or
want to win, similar to win strike rate, but not related to winning 'per se' so also applies to maiden races.
Not class specific so should be read in conjunction with our class field for a
more meaningful result.
Lowest Risk
This section looks at almost 50 conditions to determine
the risk of a horse in a race. Some examples include distance, jockey and track
experience. This category indicates the lowest risk horse in the race, NOT a low risk
horse.
The number next to the horse name is our risk rating. A
(1) indicates that the risk is very low. This field is a great indicator and
should be checked in your studies. Carefully scrutinize horses that have a risk
factor greater than 20. Horses lower than 30 points are listed.
Best Win Strike
A basic category on WIN success. Maiden races will have
this section empty. WE
DO NOT USE THIS CATEGORY IN OUR CALCULATIONS. Win Strike Rate is a common
parameter used by the public and our system is designed to follow value
around public opinion. If a horse is a good overlay and also has a high
rating here, you are getting great value.
The number next
to the horse name is the strike rate in percent.
Best Place Strike
A basic category on
PLACE success. WE
DO NOT USE THIS CATEGORY IN OUR CALCULATIONS. Place Strike Rate is a common
parameter used by the public and our system is designed to follow value
around public opinion. If a horse is a good overlay and also has a high
rating here, you are getting great value.
The number next
to the horse name is the strike rate in percent.
Good Positioning
The top raters of the
Rpos
table (refer above). We do not present "-1" delta when there is only
one run. High
ratings here must make the horse worthwhile considering.
Barrier Trail Well
Usually for horses returning from a spell. This is
something that should be in our main calculations but is usually difficult to
quantify. If a horse is in this category and is in the betting - give it some
thought and bear in mind that our calculations exclude this knowledge. We will
rarely include a '#' symbol next to the horses in this category. This means
that this horse typically runs well first up. So if it is training well and
runs well first up... well you be the judge.
Light & Fast
Uses Best
Speed/Wgt ratings but carefully looks at the
weight shift to determine if at a true advantage today. Seriously give
these horses a consideration.
Form Guide - Easy Form (Part B)
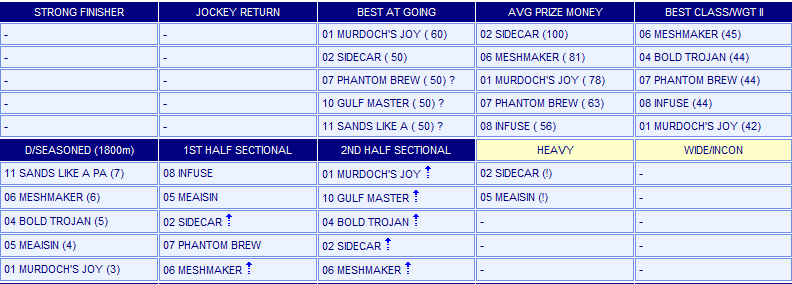
Strong Finisher
Horses that run middle
to back field and finish
strongly irrespective of class and speed. The positioning, final sectionals
and the length of the straight are all taken into consideration. This is
extremely useful for horses moving quickly up in class, because the class is
unclear and the times are set by lower class pace setters.
Jockey Return
This is an interesting category where we believe a
jockey is returning to horse to run it at its best ability today. Watch (and be
prepared) for dramatic changes in betting.
Best At Going
The "?" indicator means that the runs at the going are 2 runs or less, so the sample may be a little low to make any
judgement. The
(###) value provides a 'point system' strike rate with one point for 1st and
fractions for 2nd and 3rd. Since decimals are rounded, points may be
slightly exaggerated for small samples. A ( 100) means 100% strike rate and can
only be achieved if they were all wins.
Average Prize Money
We average the prize
money of recent runs (this is not the standard Average Prize Money used on some
TAB forms), of each horse with an importance placed on the
most recent races. More often than not, winners are previous prize money
winners, so make sure your methods check this category. The category alone
can sometimes be misleading so also include the Tenacity
and Best Class/Wgt categorie
as a cross check. Horses that have prize money winnings without Tenacity
or Best Class/Wgt may mean an
out of class (or too heavy) or inconsistent winner. Horses that are in Tenacity
but without Prize Money may
not be a negative factor. Horses in this scenario may mean that they are just
missing or receiving small prize money winnings.
Best Class/Wgt II
Version II uses a
totally different perspective to version I (refer above) by using a simple Form Pattern checker
on recent runs only (or first run run/s if
running after a spell). This allows you to get a quick gauge of the horse's
recent ability. It does not take into consideration at what distances etc
so use with some caution. We have not focused on this field but have seen this
field select many longshot winners so maybe worthwhile monitoring for long
shots or checking the other categories to ensure that the horse can run the
distance etc.
D/Seasoned
Ranking
of best horses distance 'seasoned' to run at today's distance using official
race data. It should be a reasonable indicator that the horse will run out the
distance. The rule is, the longer the distance, the more distance seasoning
required. However horse training is not always official (e.g. at trackwork,
barrier trials etc) so a horse can still be seasoned without any indicator here.
1st Half Sectional
Horses
(in order) that will run the first sectional quickly. The blue arrow pointing upwards means that the horse may improve from this position. A red arrow pointing downwards means that the horse may struggle maintaining this position.
2ndt Half Sectional
Horses
(in order) that will run the last sectional quickly. The blue arrow pointing upwards means that the horse may improve from this position. A red arrow pointing downwards means that the horse may struggle maintaining this position.
Heavy
DISADVANTAGE
FIELD: This rating penalises horses that are heavy in weight
and up in weight from previous starts (constantly heavy horses are not
penalised). Horses that run at the back of the field and are slow down
the straight are indicated with an exclamation mark "(!)". these
horses should be avoided unless the horse is a quality horse with good natural
speed and turn-of-foot. This category is strongly used in our penalty system
to set the market price. Refer to the section above "Heavy Weight Marker/s" for more details on the Exclamation Mark system.
Wide/Inconvenienced
DISADVANTAGE
FIELD: Horses in this
category may run wide or may be inconvenienced in this race. Typically these
horses are slow to jump and have a wide barrier (relative to the other horses in
a similar running position), hence the likelihood to run wide or be
inconvenienced by the jockey sending the horse forward or backward in the field.
This information is useful if you wish to lay a horse and this field adds
further confidence (do not use solely) or if you want to remove some risk from
your larger bets (ie avoid bet on horses that may be inconvenienced).
Since the running of the race can vary greatly, this category is not 100%
accurate, however, tends to fall true in larger field races and where the pace
is genuine. It is also important to note that horses can win running wide
(especially if the track conditions suit) and some horses may find the assumed
"inconvenienced" position actually convenient (ie mid field runner up
front may find that it's a strong front runner). The HRT prices reflect some
risk component in the price.
Form Guide - Speed Map
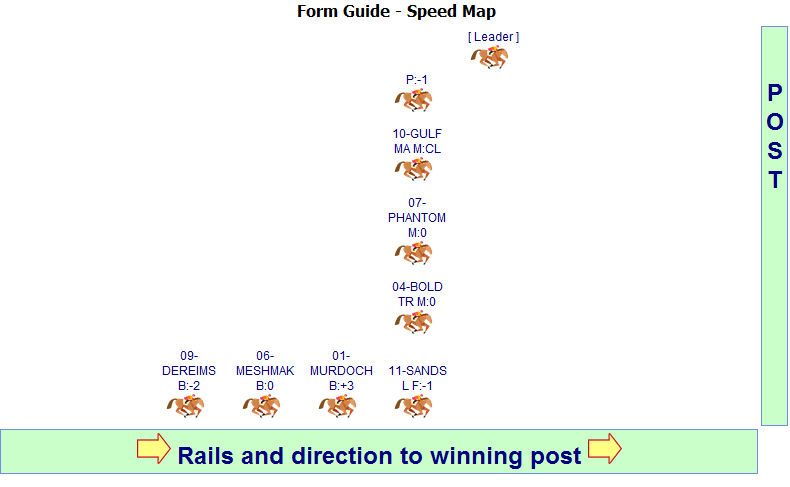
The
"Leader" horse indicates where the Front (F) running horse should be
in a normal pace race (distance taken into consideration). If the Front runner
is significantly to the left of the "Leader", then this may mean a
slower pace race and could advantage the front runners. The Front runner significantly
to the right of the "Leader" may advantage the backmarkers (especially
if other horses are to the right of the "Leader" horse as well).
Horses out wide could also be disadvantaged.
Form Guide - Quinella and Exacta Tables

Suggested
Quinella and Exacta overlays, however, since exotics are not normally fixed
price and most TABS do not provide pre-start exotic tote odds, these tables are
not too useful.
Print this page
|